1 Unboxing mini210s
So you just received your mini210s board and you may be wondering where to start...This is the right place to get
2 Required Accessories
One mini210s Board
One LCD Module(5.0"LCD or 7"LCD)
One Serial cable
One net cable
One Mini-USB cable
One 5V@2A Power adapter
One DVD
3 Connection Guide
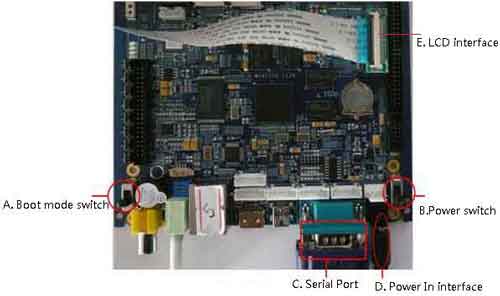
1.Set the Boot mode switch(A) for Nand Flash boot mode.
2. Insert the power adapter to the Power interface(D), Don't power on the board.
3. Using a serial cable, connect the Debug serial port(C) of the mini210s board to the Serial Port on your PC.
4. insert the LCD cable to the LCD interface(E).
5. Power on the board(B), you can enter the Android system default.
4 Hyperterminal setting on PC
Open the DNW software, and configure it as follow:
1) Find DNW software under directory CD:\Tools\DNW.exe. Double-click to open it:
2) Click “Configuration -> Options”, it will open the “UART/USB Options” dialog.
choose '115200' in 'Baud Rate'
choose 'COM1' in 'COM Port '(the COM1 means the serial number in PC )
3) click 'OK' to finish the DNW configuration:
4) Click 'Serial Port->connect' to enable the DNW serial link.
Power on the board, then you can enter the Android system by the Hyperterminal on PC default.
If you want to use the other system, you can burn the system to board as the follow chapter.
5 Key board on the mini210s
mini210s have 4 keys, the position is as follow:
Keys Name Function Reuse
K1 EINT16 GPH2_0
K2 EINT17 GPH2_1
K3 EINT18 GPH2_2
K4 EINT19 GPH2_3
|